This tutorial demonstrates how an external application can change the scene being displayed by Demorize and affect what is being displayed on the screen. This can for example be used to display fire alarm screens or other urgent messages that are triggered by some external event.
We will be constructing a project where a welcome screen is normally displayed. An external event will then be connected to the project which makes it change screen into an Alert screen when this event is triggered.
In this tutorial we will be using a text file as the triggering mechanism for changing screen. The file is used as a database within Demorize, but it is actually just a regular text file that can be edited with Notepad or written to by some external application.
We are going to start with a new blank project in Demorize for this tutorial. Just go to the Projects tab on the Demorize start screen, click on the "Create new project..." button and navigate to where you want the project to be created. A new folder containing all project files will be created with the name you specify.
In Demorize we are starting by creating a data source that contains the value that we shall trigger scene changes on. This is done by inserting a new Text File data source into the project by clicking on the Text File button in the Insert menu. Click on the little down arrow in the right of the button to bring up a menu that allows you to create and embed all the necessary files needed.

Name the new data source "AlertData".
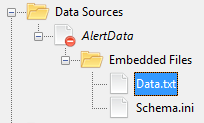
Double click on the Data.txt file to open it in a text editor. Now enter the following two rows into the text file and save it:
Save the project (Ctrl+s) to update the data source.
The Welcome layer will be displayed when the IsAlert value in the data source is set to 0. This tutorial will not go into detail on how to create a fancy screen, but if you are interested in the one displayed below you can look at the example project that is shipped with Demorize. That example contains a background image, a particle system displaying the circles on the top of the screen and a big Welcome text object on the bottom that has a Drop Shadow filter added to it.

For the sake of the tutorial it is enough if you create a new layer, name it "Welcome" and add a text object to the layer that just says "Welcome".
The Alert layer will be displayed when the IsAlert value in the data source is set to 1. This tutorial will not go into detail on how to create a fancy screen for this layer either, but as with the Welcome layer you find one with the example project that is shipped with Demorize. That example contains an Alert layer that has a text object with a Bloom filter on it where the text color is animated by the timeline. The layer also contains a scrolling text at the bottom.

For the sake of the tutorial it is enough if you create a new layer, name it "Alert" and add a text object to the layer that just says "Alert". You can make the text red with the Text Color setting in the properties view to the right in Demorize if you want to make it stand out more from the Welcome screen.
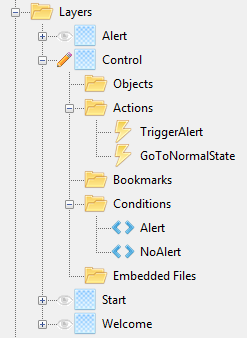
The Control layer is actually not a layer that displays anything on the screen. We are going to use this layer to control which of the two scenes, containing the Welcome or Alert layers, that is the one being displayed. We are going to switch scene by the use of Conditions and Actions. The conditions we are adding will look at the IsAlert value in the database we created above and trigger the respective action when its value changes.
Start by creating a new layer and name it "Control". Then add two Actions to the layer by right-clicking on the Actions item in the project view and select New Action. Name the two actions "TriggerAlert" and "GoToNormalState". Now add two Conditions to the layer in the same way and name them "Alert" and "NoAlert".
Select the Alert condition and look at the properties view to the right in Demorize. There are two things we are going to change here. The first thing is that we are going to select which action that shall be triggered once the condition evaluates to true. Click on the Action property and select the TriggerAlert action we created earlier. Now click on the Expression property and type "@{AlertData.data:IsAlert[0]} ~= 0".
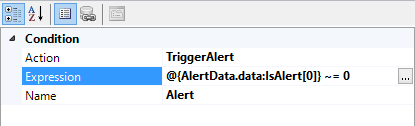
To make it easier to type data references you can click on the "..." button on the property once you have placed the cursor in the Expression property field. You will now come to a text editor where there is a button "Insert Data Reference". A dialog will open that allows you to easier select the data source and field you want to reference.

You then have to type the " ~= 0" by yourself in the text edit dialog after you have inserted the data reference. The sentence we just entered means: Compare the value of the data reference and check if it is not equal to 0. I.e. the condition will evaluate to true if the value is set to 1.
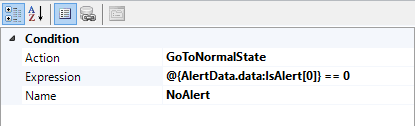
Now edit properties of the NoAlert condition and make it use the GoToNormalState action and type "@{AlertData.data:IsAlert[0]} == 0" into the Expression field. What this expression means is: Compare the value of the data reference and check if it is equal to 0.
With the trigger conditions in place we need to change what the actions do once they are triggered. Editing an action is done by selecting Properties from its context menu or by double clicking it in the project view.
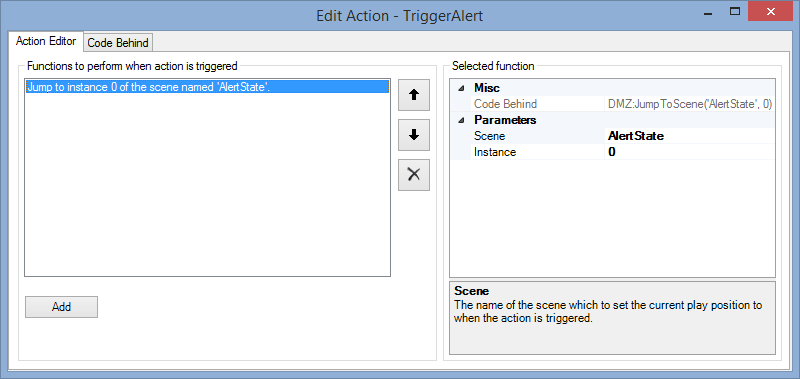
Let's first edit the TriggerAlert action. We want this action to make a jump in the stream to the Alert scene. We haven't yet created the scenes but the Alert scene will display the Alert layer. To make this jump we simply add a script statement in the Action Editor. Click the Add button and select the "Jump to scene" item from the menu that is shown. A new function is added to the script and to the right in the Action Editor you will see the function's parameters. The "Jump to scene" function has a parameter named "Scene" that we need to edit. Type "AlertState" into this parameter. We will create this scene later. We are done with TriggerAlert action so close the dialog.
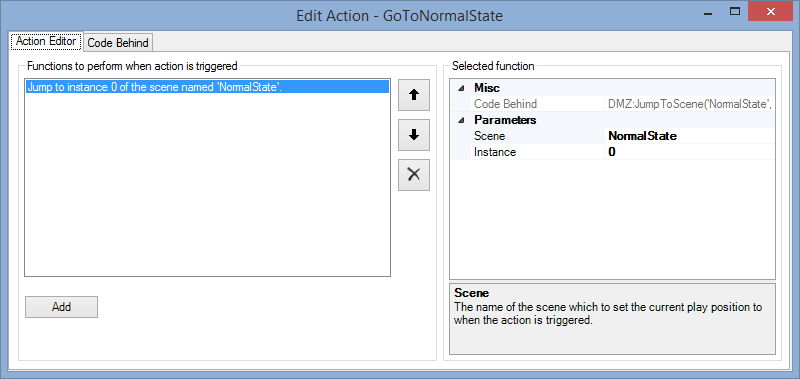
Edit the GoToNormalState action in the same way as the TriggerAlert action, but instead make it jump to a scene named "NormalState". We will soon create this scene also.
We now have the basic functionality in place to trigger scene changes. Now we just have to create the scenes that we mentioned earlier. This is easily done by adding two new scenes and naming them AlertState and NormalState as we mentioned earlier when we created the jump actions.
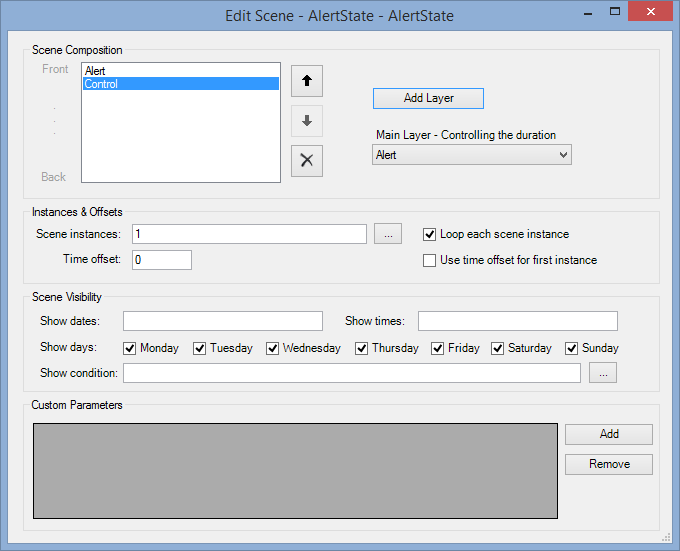
Let's edit the AlertState scene first. Open its properties by double clicking it. Click the Add Layer button and insert the Alert layer and then again to insert the Control layer into the Scene Composition. By adding these two layers to the same scene we are allowing them both to work at the same time. The Alert layer will display its graphics and the Control layer will handle the scene change when the IsAlert value changes in the text file and triggers the actions in the Control layer.
We are going to change one more thing in the scene properties. It is the "Loop each scene instance" that we want to enable. What this setting does is that it starts the scene over from the beginning when it reaches its end. Normally when this setting is not enabled the stream would continue by playing the next scene that is in the stream, but by enabling this we will loop locally in the scene until some action forces the stream timeline to jump elsewhere. In our case we want to stay on the Alert screen until the GoToNormalState action forces us to go to the welcome screen again.
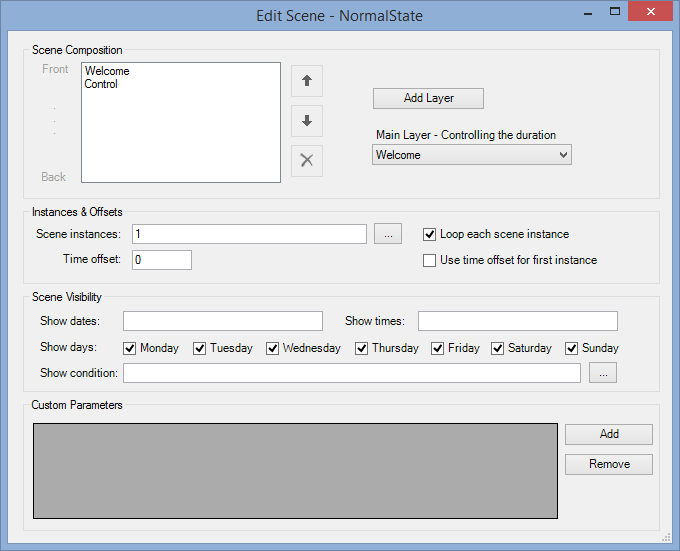
Now edit the NormalState scene. Do as with the AlertState scene but add the Welcome layer and the Control layer to this one. Don't forget to check the "Loop each scene instance" in this scene too.
A stream is a definition of which scenes that are included in the presentation and in which order they are played. In our case we have set the ordering functionality a bit out of play by using the local looping functionality of a scene and jump actions. The stream will however run from the beginning and through the scenes until it reaches a scene that has local looping or until an action performing a scene jump is triggered.
Edit the stream by double clicking it in the project view and add the NormalState and the AlertState to it.
Our setup of the whole project is almost complete. We could stop here and have a working presentation that would switch scene based on the contents of the data source text file. However, there is one case which we haven't handled yet and that is the start-up case.
When the presentation starts it will always start with the first scene in the stream. The triggers that switch scene will not be triggered since they react on a value change. To fix this start-up scenario we are going to add a new scene and layer with a bookmark in it at the start of the timeline. The bookmark will execute an action that checks if it shall jump to the AlertState scene or not.
Start by adding a scene named "Start". Then add an action and name it "CheckAlertAction". On the layer's timeline, add a bookmark at the very beginning of the timeline by right-clicking on the timeline bar and select "Add bookmark" from the context menu. Move the bookmark to time 00:00:00 to make it execute as soon as the scene starts. Edit the properties of the bookmark and select "CheckAlertAction" as its Action. Once the time passes this bookmark it will now execute the action. While you are at the timeline you can also decrease its length to a second or so to not make the start scene show a long blank screen when starting.
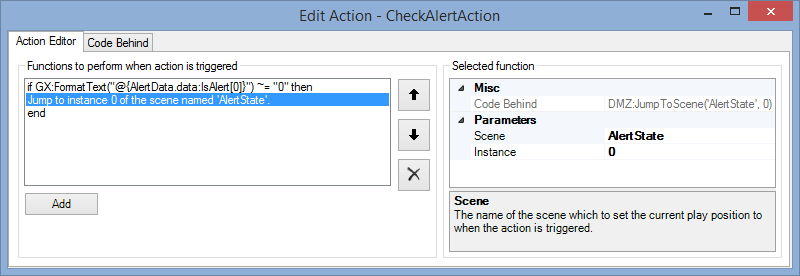
Now edit the properties of the CheckAlertAction. We are now going to the Code Behind tab in the action editor dialog to enter some scripting logic using the Lua scripting language to handle the conditional jumping to the alert scene. Add the following code:
if GX:FormatText("@{AlertData.data:IsAlert[0]}") ~= "0" then
DMZ:JumpToScene('AlertState', 0)
end
What this code does is check if the IsAlert value in the AlertData text file data source is not equal to "0" and in such case executes the jump statement to go to the AlertState scene. This means that if the value is set to "1" it will perform the jump.
If you switch back to the Action Editor tab in the dialog you will now see that the code for the jump statement you entered is translated into a readable text form. Everything you enter into the Action Editor is actually scripting code. It is just for your convenience that there are a number of pre-defined actions available to add when you click the Add-button. These can be edited in the Code Behind tab as well if you want to create more complex logic.
The final step is to create a new Scene and name it "Start". Add the Start layer to the Start scene and then finally add the Start scene to the stream. Make sure to place the Start scene at the top in the stream to make it run before any of the other scenes.
The project is finished. Make sure to save the project before you launch the player to test it.
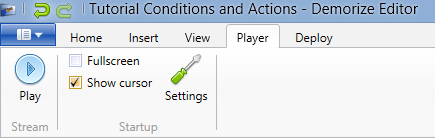
To test the project we are going to run the Demorize Player application to see the actual result. You can do this by launching the player from within the Demorize Editor. This can either be done by right-clicking the stream and selecting "Play" from the context menu or by going to the Player tab on the top menu in Demorize Editor. Since we are going to be editing a text file at the same time as we are running the player we will make the player not run in fullscreen mode during this testing. Disable the "Fullscreen" setting and enable the "Show cursor" setting in the player settings.
Now press the Play button to launch the project.
After the player has started and starts showing the Welcome screen, go back to the editor and go to the AlertData data source in the project view. Expand the AlertData node and the Embedded Files node to show the text file that contains our IsAlert value. Double-click the Data.txt file to open it in a text editor. Now change the 0 into a 1 and save the file. Watch how the Demorize Player window now switches scene into the Alert scene. By changing the value back to a 0 and saving the text file again it will go back to the Welcome screen.
You are now finished and have a working example of a project that reacts on external input. The Data.txt text file can be written to by any external application, which allows you to integrate the player behavior with other systems.